Helminth Hatchery
Helminth Hatchery is part of the Seekers of the Storm DLC. It is only available if the DLC is enabled when starting a run. Click for more info.Helminth Hatchery | |
|---|---|

| |
| A Brother's Respite | |
| Stage | 5 |
| Soundtrack | 屋根の漏り (Yane No Mori) |
| Lunar Seer Quote | |
| You dream of wurms. | |
| Description | |
| A complex city-like structure built in a volcanic environment. Tunnels and wurms litter the environment and a forge sits near the top. | |
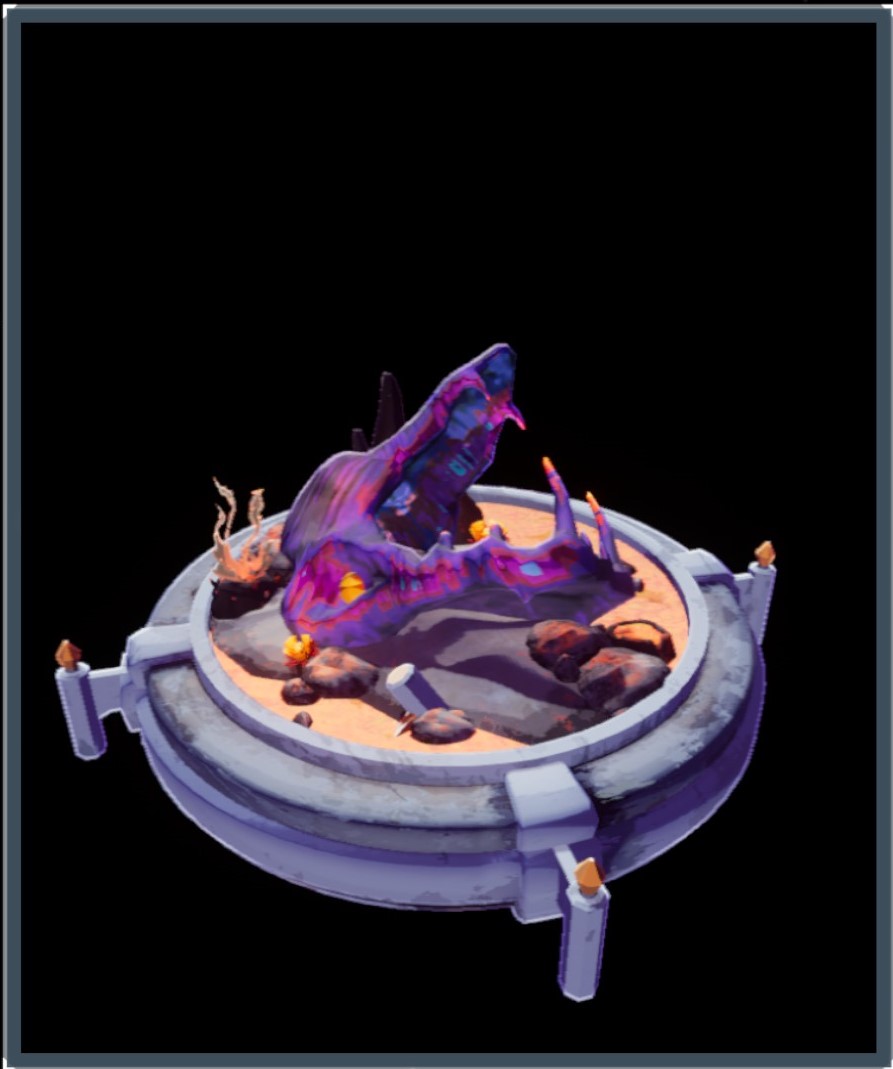
Helminth Hatchery is one of the five new environments added to the game with the Seekers of the Storm, located on Petrichor V, and is found in the fifth set of Environments in Risk of Rain 2.
This map is a complex city-like structure located inside a massive lava cavern. Glassy tunnels formed by the movement of Wurms twist through the structure, and there is an Artifact teleporter at the top.
The ![]() Bulwark's Ambry
Bulwark's Ambry![]() Bulwark's Ambry (Hidden Realm)
Bulwark's Ambry (Hidden Realm)
Hidden Realm: Bulwark's Ambry
The area consists of block-shaped platforms, with the Artifact Reliquary in the center. can be accessed from this stage which is where the 16 Artifacts are unlocked.
The teleporter in this Environment is a unique version called the Primordial Teleporter which has outer rings that can be interacted with prior to starting the Teleporter Event to either align with the moon to access ![]() Commencement
Commencement![]() Commencement (Final)
Commencement (Final)
Moon of Petrichor V
You dream of glass and dirt.
Large domain located above the shattered breach of ![]() Petrichor V's moon. It is made up of the shattered remains of four individual sections, emblematic of
Petrichor V's moon. It is made up of the shattered remains of four individual sections, emblematic of ![]() Mithrix
Mithrix Mithrix
King of NothingHP: 1000 (+300 per level)
Damage: 16 (+3.2 per level)
Class: Melee / Ranged
Speed: 15 m/s
Armor: 20 and Providence's tools of creation. or to align with the planet to Loop.
Interactables
- Chest
- Damage Chest
- Healing Chest
- Utility Chest
- Large Chest
- Equipment Barrel
- Multishop Terminal (Green)
- Multishop Terminal (Equipment)
- Lunar Pod
- Barrel
- Shrine of Combat
- Shrine of the Mountain
- Shrine of Chance
- Healing Drone
- Missile Drone
- Incinerator Drone
- Equipment Drone
- Gunner Turret
- Cloaked Chest
- Legendary Chest (starting stage 4)
- Altar of Gold (starting stage 2)
- Radio Scanner
- 3D Printer (White)
- 3D Printer (Green) (starting stage 2)
- Mili-Tech Printer (starting stage 5)
- Scrapper
- Void Cradle (only with SotV)
- Void Seed (only with SotV starting stage 2)
- Compound Generator
- Teleporter
- Artifact Portal
- Shrine of Shaping
- Halcyon Shrine
Monsters

 Seekers of the Storm - DLC Content
Child is part of the Seekers of the Storm DLC. It is only available if the DLC is enabled when starting a run.
Click for more info. Child
Child Seekers of the Storm - DLC Content
This content is part of the Seekers of the Storm DLC. It is only available if the DLC is enabled when starting a run.
Click for more info.Child
HP: 150 (+45 per level)
Damage: 14 (+2.8 per level)
Class: Ranged
Speed: 8.5 m/s
Armor: 0 Elder Lemurian
 Elder Lemurian
HP: 900 (+270 per level)
Damage: 16 (+3.2 per level)
Class: Ranged
Speed: 13 m/s
Armor: 0 Greater Wisp
 Greater Wisp
HP: 750 (+225 per level)
Damage: 15 (+3 per level)
Class: Ranged
Speed: 7 m/s
Armor: 0 Imp Overlord
 Imp Overlord
Lord of the Red PlaneHP: 2800 (+840 per level)
Damage: 16 (+3.2 per level)
Class: Melee / Ranged
Speed: 13 m/s
Armor: 20 Jellyfish
 Jellyfish
HP: 60 (+18 per level)
Damage: 5 (+1 per level)
Class: Self-Destruct
Speed: 10 m/s
Armor: 0 Lesser Wisp
 Lesser Wisp
HP: 35 (+10 per level)
Damage: 3.5 (+0.7 per level)
Class: Ranged
Speed: 6 m/s
Armor: 0 Magma Worm
 Magma Worm
Ancient Lava SwimmerHP: 2400 (+720 per level)
Damage: 10 (+2 per level)
Class: Melee
Speed: 20 m/s
Armor: 15 Mini Mushrum
 Mini Mushrum
HP: 290 (+87 per level)
Damage: 16 (+3.2 per level)
Class: Ranged
Speed: 2 m/s
Armor: 0 Overloading Worm
 Overloading Worm
The ReminderHP: 12000 (+3600 per level)
Damage: 50 (+10 per level)
Class: Melee
Speed: 20 m/s
Armor: 15 Parent
 Parent
HP: 585 (+176 per level)
Damage: 16 (+3.2 per level)
Class: Melee
Speed: 11 m/s
Armor: 0- Seekers of the Storm - DLC Content
Scorch Wurm is part of the Seekers of the Storm DLC. It is only available if the DLC is enabled when starting a run.
Click for more info. Scorch Wurm
 Seekers of the Storm - DLC Content
This content is part of the Seekers of the Storm DLC. It is only available if the DLC is enabled when starting a run.
Click for more info.Scorch Wurm
HP: 580 (+174 per level)
Damage: 17 (+3.4 per level)
Class: Ranged
Speed: 16 m/s
Armor: 0  Solus Control Unit
 Solus Control Unit
Corrupted AIHP: 2500 (+750 per level)
Damage: 15 (+3 per level)
Class: Ranged / Melee
Speed: 7 m/s
Armor: 20 Solus Probe
 Solus Probe
HP: 220 (+66 per level)
Damage: 15 (+3 per level)
Class: Ranged
Speed: 10 m/s
Armor: 10
- After Looping:
 Scavenger
 Scavenger
Item HoarderHP: 3800 (+1140 per level)
Damage: 4 (+0.8 per level)
Class: Ranged
Speed: 3 m/s
Armor: 20
- Family Event only:
 Grovetender
 Grovetender
Wisp CultivatorHP: 2800 (+840 per level)
Damage: 23 (+4.6 per level)
Class: Ranged
Speed: 10 m/s
Armor: 20 (Wisp Family event)
 Survivors of the Void - DLC Content
Gup is part of the Survivors of the Void DLC. It is only available if the DLC is enabled when starting a run.
Click for more info. Gup
Gup Survivors of the Void - DLC Content
This content is part of the Survivors of the Void DLC. It is only available if the DLC is enabled when starting a run.
Click for more info.Gup
HP: 1000 (+300 per level)
Damage: 12 (+2.4 per level)
Class: Melee
Speed: 12 m/s
Armor: 0 (Gup Family event)- Survivors of the Void - DLC Content
Geep is part of the Survivors of the Void DLC. It is only available if the DLC is enabled when starting a run.
Click for more info. Geep
Geep Survivors of the Void - DLC Content
This content is part of the Survivors of the Void DLC. It is only available if the DLC is enabled when starting a run.
Click for more info.Geep
HP: 500 (+150 per level)
Damage: 6 (+2 per level)
Class: Melee
Speed: 8 m/s
Armor: 0- Survivors of the Void - DLC Content
Gip is part of the Survivors of the Void DLC. It is only available if the DLC is enabled when starting a run.
Click for more info. Gip
Gip Survivors of the Void - DLC Content
This content is part of the Survivors of the Void DLC. It is only available if the DLC is enabled when starting a run.
Click for more info.Gip
HP: 250 (+75 per level)
Damage: 3 (+0.6 per level)
Class: Melee
Speed: 5 m/s
Armor: 0
 Imp
Imp Imp
Imp
HP: 140 (+42 per level)
Damage: 10 (+2 per level)
Class: Melee
Speed: 10 m/s
Armor: 0 (Imp Family event) Lemurian
 Lemurian
HP: 80 (+24 per level)
Damage: 12 (+2.4 per level)
Class: Ranged / Melee
Speed: 7 m/s
Armor: 0 (Lemurian Family event) Lunar Chimera (Exploder)
 Lunar Chimera (Exploder)
Zenith DesignsHP: 180 (+54 per level)
Damage: 11 (+2.2 per level)
Class: Ranged / Self-Destruct
Speed: 8 m/s
Armor: 0 (Lunar Family event) Lunar Chimera (Golem)
 Lunar Chimera (Golem)
Zenith DesignsHP: 1615 (+485 per level)
Damage: 35 (+7 per level)
Class: Ranged
Speed: 8 m/s
Armor: 0 (Lunar Family event) Lunar Chimera (Wisp)
 Lunar Chimera (Wisp)
Zenith DesignsHP: 850 (+255 per level)
Damage: 15 (+3 per level)
Class: Ranged
Speed: 18 m/s
Armor: 0 (Lunar Family event)


.png)
.png)
.png)
Compound Generator
An alcove at the top of the stage houses the Compound Generator, a large machine used to spawn the Artifact Portal leading to ![]() Bulwark's Ambry
Bulwark's Ambry![]() Bulwark's Ambry (Hidden Realm)
Bulwark's Ambry (Hidden Realm)
Hidden Realm: Bulwark's Ambry
The area consists of block-shaped platforms, with the Artifact Reliquary in the center.. It is accessible by climbing up the structure to the very top.
Monsters will not spawn in the alcove housing the Compound Generator, but they can follow you up from below.
The Compound Generator can be interacted with in two ways:
- 9 switches can be cycled through displaying one of four shapes: square, circle, triangle, diamond (■ ● ▲ ♦). In a specific sequence, these 9 shapes can generate the artifact portal.
- The computer can be used to submit the current code to the Generator that will then try to open the Artifact Portal.
If the wrong code is submitted, the Portal's opening will fail and players can put in another code.
Using the Artifact Portal will lead to Bulwark's Ambry where the players will face a trial to unlock the Artifact corresponding to the code entered in the Compound Generator. It is possible to completely skip the Teleporter Event of Helminth Hatchery by going through this teleporter, but players can still use the Artifact Portal after completing the Teleporter Event.
For a spoiler free way to find the Artifact Codes, see Artifact Hints. Otherwise, see Artifacts for more information.
Newt Altars
There are 5 possible locations for the Newt Altars:
- At the very top of the map, within the mouth of the Wurm remains.
- Beside a giant vase on the upper floor of two of the right most building.
- On the upper floor of the outer tower, between two pots & beside a pillar.
- Nestled in the corner of the room behind the glassy tunnel that leads to the ruined bridge.
- At the tail of the Wurm remains, located underneath the part that arches upwards.

1. In the mouth of the Wurm remains

2. On the upper floor of the rightmost building

3. On the upper floor of the outer tower

4. In the room beside the glassy tunnel

5. Underneath the tail of the Wurm remains


Lore
Massive shining coils shift, red as Mercury blossoms, revealing a sphere of bright molten obsidian glowing inside a bowl of red stone.
Four stories up a large dark hand reaches through the glassless window, pets the coils and brings the bowl inside.
Strange tools of silver line the walls alongside endless artifacts freely given, intricately carved, and tenderly loved. His tribute.
He pulls an oblong clay jar down, a seal bearing his likeness breaks under his grip with a hiss.
Inside the jar, crackling starseed thorns and dried kifruit skins, their earthy scent fills the smoldering workshop.
For the morning star, he reaches into the molten obsidian and pierces the bowl with a starseed thorn from within. A thorn for each fate changed.
Many thorns and fates later, he tap tap taps a silver tool against the stone of the workshop.
Red coils in the window shift again, a massive burning eye curiously takes in the room, then it’s open mouth appears in the window, the sudden heat wave sending a song through a ceiling of silver chimes.
He places the spiked obsidian ball inside and pats it’s muzzle twice. The gilded worm is to take the mace to the surface. The obsidian cools in a shaft of putrid moonlight, collecting lunar rage and loneliness.
For the handle, he wraps a rod of silver in dried kifruit skins and an eon of freedom, lost to gravity wells long ago.
Finally, he seals the obsidian weapon with a golden T emblem.
His gift. No, his apology.
Version History
- Major Content
- Added New Stage: Helminth Hatchery
Trivia
- Helminth Hatchery is the first alternate environment for a Stage 5 in the series, and therefore shares a lot of functionality and similarities with
 Sky Meadow
 Sky Meadow (Stage 5)
Sprite Fields
You dream of serenity.
A lush, violet meadow located high in the planet's atmosphere. Meteors rush through the terrain and the moon is clearly visible in the sky..
| Risk of Rain 2 Wiki |
|---|
| Main |
| Artifacts • Challenges • Chests • Difficulty • Drones • Equipment • Interactables • Items • Item Stacking • Lore • Mechanics • Monsters • Newt Altars • Prismatic Trial • Shrines • Status Effects |
| Survivors |
 CommandoThe Commando is a jack-of-all-trades character that is reliable in all situations of the game. CommandoThe Commando is a jack-of-all-trades character that is reliable in all situations of the game.Class: Ranged HP: 110 (+33 per level) Damage: 12 (+2.4 per level) Armor: 0 Umbra: Cornered Gunslinger •  HuntressThe Huntress is an extremely mobile but fragile survivor with a high damage output. HuntressThe Huntress is an extremely mobile but fragile survivor with a high damage output.Class: Ranged HP: 90 (+27 per level) Damage: 12 (+2.4 per level) Armor: 0 Umbra: Judge, Jury, Executioner •  BanditThe Bandit is a high-skill combo character that can dish out devastating backstabs while weaving in and out of stealth. BanditThe Bandit is a high-skill combo character that can dish out devastating backstabs while weaving in and out of stealth.Class: Ranged HP: 110 (+33 per level) Damage: 12 (+2.4 per level) Armor: 0 Umbra: Desperate Outlaw •  MUL-TMUL-T is an aggressive survivor who has the tools necessary for any job! MUL-TMUL-T is an aggressive survivor who has the tools necessary for any job!Class: Melee / Ranged HP: 200 (+60 per level) Damage: 11 (+2.2 per level) Armor: 12 Umbra: Right Tool for the Wrong Job •  EngineerThe Engineer is a unique class that requires planning and positioning to be successful. EngineerThe Engineer is a unique class that requires planning and positioning to be successful.Class: Ranged HP: 130 (+39 per level) Damage: 14 (+2.8 per level) Armor: 0 Umbra: Fortification Expert •  ArtificerThe Artificer is a high burst damage survivor who excels in fighting large groups and bosses alike. ArtificerThe Artificer is a high burst damage survivor who excels in fighting large groups and bosses alike.Class: Ranged HP: 110 (+33 per level) Damage: 12 (+2.4 per level) Armor: 0 Umbra: Herald of the House Beyond •  MercenaryThe Mercenary is a high skill melee survivor that uses his many dodges to weave in and out of combat. MercenaryThe Mercenary is a high skill melee survivor that uses his many dodges to weave in and out of combat.Class: Melee HP: 110 (+33 per level) Damage: 12 (+2.4 per level) Armor: 20 Umbra: Hired Blade •  REXREX is a half robot / half plant that uses HP to cast devastating skills from a distance. The plant nor the robot could survive this planet alone – but thankfully they have each other. REXREX is a half robot / half plant that uses HP to cast devastating skills from a distance. The plant nor the robot could survive this planet alone – but thankfully they have each other.Class: Ranged HP: 130 (+39 per level) Damage: 12 (+2.4 per level) Armor: 20 Umbra: Symbiotes •  LoaderThe Loader is a slow but powerful bruiser that can use her grappling hook to uniquely navigate the environment. LoaderThe Loader is a slow but powerful bruiser that can use her grappling hook to uniquely navigate the environment.Class: Melee HP: 160 (+48 per level) Damage: 12 (+2.4 per level) Armor: 20 Umbra: Bionic Powerhouse •  AcridAcrid is a melee-range hybrid who uses powerful poisons to melt tanky enemies. AcridAcrid is a melee-range hybrid who uses powerful poisons to melt tanky enemies.Class: Melee / Ranged HP: 160 (+48 per level) Damage: 15 (+3 per level) Armor: 20 Umbra: Test Subject •  CaptainThe Captain is a unique survivor that can control the battlefield with utility and damage - with help from the UES Safe Travels. CaptainThe Captain is a unique survivor that can control the battlefield with utility and damage - with help from the UES Safe Travels.Class: Ranged HP: 110 (+33 per level) Damage: 12 (+2.4 per level) Armor: 0 Umbra: Tired Veteran • Railgunner is part of the Survivors of the Void DLC. It is only available if the DLC is enabled when starting a run. Click for more info.  This content is part of the Survivors of the Void DLC. It is only available if the DLC is enabled when starting a run. Click for more info.RailgunnerThe Railgunner is a long-range, single target survivor that can instantly kill any high priority target - and from any range. Class: Ranged HP: 110 (+33 per level) Damage: 12 (+2.4 per level) Armor: 0 Umbra: Forgotten Nomad • Void Fiend is part of the Survivors of the Void DLC. It is only available if the DLC is enabled when starting a run. Click for more info.  This content is part of the Survivors of the Void DLC. It is only available if the DLC is enabled when starting a run. Click for more info.Void FiendThe Void Fiend is a corrupted survivor that fluctuates between a controlled and corrupted form, each with different strengths and weaknesses. Managing this curse has become its fate. Class: Ranged HP: 110 (+33 per level) Damage: 12 (+2.4 per level) Armor: 0 Umbra: Corrupted Amnesiac • Seeker is part of the Seekers of the Storm DLC. It is only available if the DLC is enabled when starting a run. Click for more info.  This content is part of the Seekers of the Storm DLC. It is only available if the DLC is enabled when starting a run. Click for more info.SeekerAs a meditative mid-range brawler, Seeker utilizes powerful healing to sustain herself and her team. Class: Ranged HP: 115 (+34 per level) Damage: 12 (+2.4 per level) Armor: 20 Umbra: Diviner of House Beyond • False Son is part of the Seekers of the Storm DLC. It is only available if the DLC is enabled when starting a run. Click for more info.  This content is part of the Seekers of the Storm DLC. It is only available if the DLC is enabled when starting a run. Click for more info.False SonThe False Son is a slow but stalwart close-range warrior. With extreme health and defense, False Son can weather any storm. Use False Son's durability to stay in the fray and capitalize on his slow but deadly skills. Class: Melee HP: 180 (+54 per level) Damage: 13 (+2 per level) Armor: 20 Umbra: The Shattered Heir • Chef is part of the Seekers of the Storm DLC. It is only available if the DLC is enabled when starting a run. Click for more info.  This content is part of the Seekers of the Storm DLC. It is only available if the DLC is enabled when starting a run. Click for more info.ChefA survivor of high class, Chef specialises in only the most exquisite meals and combos. As a culinary master, Chef uses a variety of practiced skills in tandem for additional benefits. Class: Ranged HP: 110 (+33 per level) Damage: 12 (+2.4 per level) Armor: 0 Umbra: Culinarian Adept •  HereticThe Heretic is a powerful character who can only be accessed through extraordinary means. HereticThe Heretic is a powerful character who can only be accessed through extraordinary means.Class: Ranged HP: 440 (+132 per level) Damage: 18 (+3.6 per level) Armor: 0 Umbra: Unorthodoxy Risen |
| Environments |
| Titanic Plains Ground Zero You dream of rolling hills. Gigantic stone arches bracket the skyline, while the main play-field overlooks a vast fractured tectonic lowland. • Distant Roost Ground Zero You dream of waves, crashing on cliffsides. Spires of earth jut through the fog and unknown avian creatures circle far peaks guarding their broods. • Verdant Falls Ground Zero You dream of sweet fruits, and bitter promises. A bright, vibrant map with cliffs, caverns, and giant towering plants surrounding some large debris. • Abandoned Aqueduct Origin of Tar You dream of sand beneath your feet. Massive skeletons and pools of tar are littered around, and a towering aqueduct pouring down tar dominates the area. • Wetland Aspect Rehabilitation Zone You dream of twisting roots. Full of ruined stone structures and swampy areas filled with water. • Rallypoint Delta 'Contact Light' Survivor Camp You dream of quiet snowfall. Rallypoint Delta is the remains of a makeshift camp constructed by a group of scattered crew members from the UES Contact Light, somewhere in the frigid tundra of Petrichor V. • Scorched Acres Wisp Installation You dream of wind, blowing through trees. Large, circular platforms make up the majority of the stage, and embers float through the air. • Abyssal Depths Tectonic Relics You dream of fire. A hellfire-forged zone of blazing heat, the Abyssal Depths are believed to be a continuation and adaptation of the Magma Barracks from Risk of Rain. • Siren's Call Ship Graveyard You dream of wind. • Sundered Grove Dormant Locus You dream of violent growth. Ancient flora has risen up to reclaim this once sacred refuge. Mazes of roots and overgrown fungus have twisted the landscape, leaving only ruins. • Sky Meadow Sprite Fields You dream of serenity. A lush, violet meadow located high in the planet's atmosphere. Meteors rush through the terrain and the moon is clearly visible in the sky. • Commencement Moon of Petrichor V You dream of glass and dirt. Large domain located above the shattered breach of MithrixKing of NothingHP: 1000 (+300 per level) Damage: 16 (+3.2 per level) Class: Melee / Ranged Speed: 15 m/s Armor: 20 and Providence's tools of creation. Siphoned Forest is part of the Survivors of the Void DLC. It is only available if the DLC is enabled when starting a run. Click for more info. Siphoned Forest This content is part of the Survivors of the Void DLC. It is only available if the DLC is enabled when starting a run. Click for more info.Siphoned Forest (Stage 1) Ground Zero You dream of fire and ice. The map is blanketed in a layer of snow, with large trees surrounded by platforms spanning multiple levels. • Aphelian Sanctuary is part of the Survivors of the Void DLC. It is only available if the DLC is enabled when starting a run. Click for more info. Aphelian Sanctuary This content is part of the Survivors of the Void DLC. It is only available if the DLC is enabled when starting a run. Click for more info.Aphelian Sanctuary (Stage 2) Cleansing Center You dream of clarity. Tall, complex structures lay surrounding a large forest. • Sulfur Pools is part of the Survivors of the Void DLC. It is only available if the DLC is enabled when starting a run. Click for more info. Sulfur Pools This content is part of the Survivors of the Void DLC. It is only available if the DLC is enabled when starting a run. Click for more info.Sulfur Pools (Stage 3) Pungent Spring You dream of brimstone. Tiered lakes of shallow sulfur pools. Arcing bridges and underground caves connect the map together. • Shattered Abodes is part of the Seekers of the Storm DLC. It is only available if the DLC is enabled when starting a run. Click for more info. Shattered Abodes This content is part of the Seekers of the Storm DLC. It is only available if the DLC is enabled when starting a run. Click for more info.Shattered Abodes (Stage 1) Ground Zero You dream of lost poetry. The ruins of a Lemurian town, shattered by a giant spike-themed impact. • Helminth Hatchery is part of the Seekers of the Storm DLC. It is only available if the DLC is enabled when starting a run. Click for more info. Helminth Hatchery This content is part of the Seekers of the Storm DLC. It is only available if the DLC is enabled when starting a run. Click for more info.Helminth Hatchery (Stage 5) A Brother's Respite You dream of wurms. A complex city-like structure built in a volcanic environment. Tunnels and wurms litter the environment and a forge sits near the top. • Reformed Altar is part of the Seekers of the Storm DLC. It is only available if the DLC is enabled when starting a run. Click for more info. Reformed Altar This content is part of the Seekers of the Storm DLC. It is only available if the DLC is enabled when starting a run. Click for more info.Reformed Altar (1 - Path of the Colossus) Shadow of the Savior You dream of refuge. A sandy, ruined temple built around the base of a giant statue of Providence. This is the first stage in the Path of the Colossus. • Treeborn Colony is part of the Seekers of the Storm DLC. It is only available if the DLC is enabled when starting a run. Click for more info. Treeborn Colony This content is part of the Seekers of the Storm DLC. It is only available if the DLC is enabled when starting a run. Click for more info.Treeborn Colony (2 - Path of the Colossus) Path of the Protector You dream of vines, cutting through the sky. A treetop village, located in a canopy directly above the Reformed Altar. This is the second stage in the Path of the Colossus. • Prime Meridian is part of the Seekers of the Storm DLC. It is only available if the DLC is enabled when starting a run. Click for more info. Prime Meridian This content is part of the Seekers of the Storm DLC. It is only available if the DLC is enabled when starting a run. Click for more info.Prime Meridian (Final - Path of the Colossus) Relic of the False Son You dream of rebirth. The top of a giant statue of Providence, and the final stage in the Path of the Colossus. The False Son (Boss) is part of the Seekers of the Storm DLC. It is only available if the DLC is enabled when starting a run. Click for more info. .png) This content is part of the Seekers of the Storm DLC. It is only available if the DLC is enabled when starting a run. Click for more info.False Son (Boss) Eye of the StormHP: 1500 (+450 per level) Damage: 17 (+3.4 per level) Class: Melee / Ranged Speed: 11 m/s Armor: 29 waits at the highest point of this area. • Viscous Falls is part of the Seekers of the Storm DLC. It is only available if the DLC is enabled when starting a run. Click for more info. Viscous Falls This content is part of the Seekers of the Storm DLC. It is only available if the DLC is enabled when starting a run. Click for more info.Viscous Falls (1 - Loop Only) Seeker's Setback You dream of falls, erupting from the flora. A night variant of Verdant Falls: mostly the same, but with a unique cave opening. Only appears after looping at least once. • Disturbed Impact is part of the Seekers of the Storm DLC. It is only available if the DLC is enabled when starting a run. Click for more info. Disturbed Impact This content is part of the Seekers of the Storm DLC. It is only available if the DLC is enabled when starting a run. Click for more info.Disturbed Impact (1 - Loop Only) Meter of the Restless You dream of stabbing shards. A night variant of the Shattered Abodes, exclusive to looping. Some of the houses that are normally closed off may open up. • Golden Dieback is part of the Seekers of the Storm DLC. It is only available if the DLC is enabled when starting a run. Click for more info. Golden Dieback This content is part of the Seekers of the Storm DLC. It is only available if the DLC is enabled when starting a run. Click for more info.Golden Dieback (2 - Path of the Colossus - Loop Only) March of the Fallen You dream of golden leaves. A loop-exclusive variant of Treeborn Colony, second stage in the Path of the Colossus. The map is covered in an orange haze and the trees' leaves have turned red, with mushrooms now growing on their trunks and branches. |
| Hidden Realms |
| A Moment, Fractured Hidden Realm: A Moment, Fractured Multiple floating islands in a void, with sharp blue crystals embedded in them. The Obelisk can be found on top of the last island. • A Moment, Whole Hidden Realm: A Moment, Whole A bleak and desolate realm. The refuge of the MithrixKing of NothingHP: 1000 (+300 per level) Damage: 16 (+3.2 per level) Class: Melee / Ranged Speed: 15 m/s Armor: 20 vengeance and destruction. • Bazaar Between Time Hidden Realm: Bazaar Between Time This stage serves as the shop in Risk of Rain 2. Players can purchase various Items with Lunar Coins or exchange items for higher-rarity ones in two crucibles. • Bulwark's Ambry Hidden Realm: Bulwark's Ambry The area consists of block-shaped platforms, with the Artifact Reliquary in the center. • Gilded Coast Hidden Realm: Gilded Coast You dream of wealth. This area is where the player fights the boss Aurelionite, the Titanic Goldweaver. • The Planetarium is part of the Survivors of the Void DLC. It is only available if the DLC is enabled when starting a run. Click for more info. The Planetarium This content is part of the Survivors of the Void DLC. It is only available if the DLC is enabled when starting a run. Click for more info.The Planetarium (Final) Cell V The Planetarium is an area somewhere within the Void, housing a collection of planets detained by the Void's denizens. It is inhabited primarily by the Voidling, the guard of the Planetarium or potentially the controller of the Void itself. • Void Fields Cosmic Prison Hidden Realm accessible only through the Bazaar Between Time. Until the cell is stabilized, the Void Fields will constantly "suffocate" the player for a small percentage of their current health. • Void Locus is part of the Survivors of the Void DLC. It is only available if the DLC is enabled when starting a run. Click for more info. Void Locus This content is part of the Survivors of the Void DLC. It is only available if the DLC is enabled when starting a run. Click for more info.Void Locus (Hidden Realm) Cell IIIVIIIIIILVIIIVLVILIVLLLVVVILIVLI You dream of potential. The Void Locus contains many Void Potentials and Cradles in place of chests, and is inhabited by Void monsters. |
| Expansions |
This content is part of the Survivors of the Void DLC. It is only available if the DLC is enabled when starting a run. Click for more info.Survivors of the Void • This content is part of the Seekers of the Storm DLC. It is only available if the DLC is enabled when starting a run. Click for more info.Seekers of the Storm |
| Alternate Game Modes |
| Eclipse • Prismatic Trials • This content is part of the Survivors of the Void DLC. It is only available if the DLC is enabled when starting a run. Click for more info.Simulacrum |
| Mechanics |
| Armor • Damage • Directors • Enemy AI • Family Events • Gold • Health • Item Stacking • Lunar Coins • Movement Speed • Proc Coefficient • This content is part of the Survivors of the Void DLC. It is only available if the DLC is enabled when starting a run. Click for more info.Void Fog • This content is part of the Survivors of the Void DLC. It is only available if the DLC is enabled when starting a run. Click for more info.Void Seed |
| Other |
| Developer Console • Development Team • Languages • Modding • Soundtrack • Unreleased Items • Version History |