Void Fields
| Void Fields | |
|---|---|
| |
| Cosmic Prison | |
| Stage | Hidden Realm |
| Soundtrack | A Glacier Eventually Farts (And Don't You Listen to the Song of Life) |
| Description | |
| Hidden Realm accessible only through the Bazaar Between Time. Until the cell is stabilized, the Void Fields will constantly "suffocate" the player for a small percentage of their current health. | |
The Void Fields are a Hidden Realm accessible only through the ![]() Bazaar Between Time
Bazaar Between Time![]() Bazaar Between Time (Hidden Realm)
Bazaar Between Time (Hidden Realm)
Hidden Realm: Bazaar Between Time
This stage serves as the shop in Risk of Rain 2. Players can purchase various Items with Lunar Coins or exchange items for higher-rarity ones in two crucibles.. It is a necessary location for the challenge ...To Be Left Alone, which unlocks the Survivor ![]() Acrid
Acrid AcridAcrid is a melee-range hybrid who uses powerful poisons to melt tanky enemies.
Class: Melee / Ranged
HP: 160 (+48 per level)
Damage: 15 (+3 per level)
Armor: 20
Umbra: Test Subject.
The Void Fields can only be accessed via the Null Portal, which is located in a hidden cave in the shaft beneath the Blue Portal in the Bazaar. The Null Portal is only accessible once per run.
Until the cell is stabilized, the Void Fields will constantly "suffocate" the player for a small percentage of their current health. This suffocation effect can kill the player.
Null Portal
The Void Fields can only be accessed once per run via the Null Portal located at the end of a path under the player in the Bazaar Between Time.
Breaching the Cell
To complete this Hidden Realm, players must activate and survive nine separate cell events. Each cell must be charged in a similar fashion to a Teleporter Event, and players are further incentivized to stand inside the cell since doing so protects them from the constant damage of the Void Fields. Cells have a radius of 20m, take one minute to charge, and only charge while players remain inside the cell.
Additionally, each consecutive cell event will result in either a new type of enemy appearing or a new item's effects being given to the current enemies, and each cell event alternates between introducing either an enemy or an item. The first two items given to the enemies are stacks of 5 Common items, the next two are stacks of 3 Uncommon items, and the last is 1 Legendary item. In total, by the ninth wave, there will be four different enemy types with five items.
Upon each cell event's completion, the players will each be granted a Void Potential orb and all enemies currently in the area will be killed. The first four events grant Common items, the subsequent four grant Uncommon items, and the final grants a Legendary item. The rewards are not tied to the items given to the enemies.
There is no obligation to complete every single cell event in order to exit the stage; the exit Null Portal is always available, allowing players to leave as soon as they want. Depending on the enemies that appear and the items they obtain, leaving early may be necessary to avoid losing a run. However, upon leaving, the Void Fields cannot be reentered for the remainder of the run.
Whether all cells have been cleared or not, exiting the Void Fields counts as finishing a stage in the underlying logic of the game. Since some Interactables, Monsters, and Family Events have a minimum stage restriction before they can spawn, it is possible to encounter something earlier than expected. For example, a ![]() Scavenger
Scavenger Scavenger
Item HoarderHP: 3800 (+1140 per level)
Damage: 4 (+0.8 per level)
Class: Ranged
Speed: 3 m/s
Armor: 20 can only spawn after clearing 5 stages, or what one could consider as looping, but by doing the Void Fields before ![]() Sky Meadow
Sky Meadow![]() Sky Meadow (Stage 5)
Sky Meadow (Stage 5)
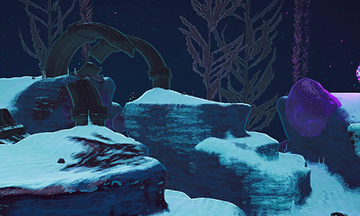
Sprite Fields
You dream of serenity.
makes it possible to encounter them there.

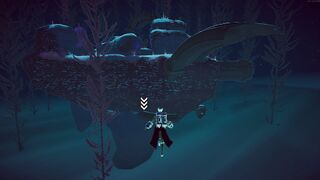
An activated Cell Vent

The charging zone of an activated Cell Vent.


Interactables
- Chest
- Large Chest
- Equipment Barrel
- Multishop Terminal (White)
- Barrel
- Cloaked Chest
- 3D Printer (White)
- 3D Printer (Green) (starting stage 2)
- Mili-Tech Printer (starting stage 5)
- 3D Printer (Overgrown) (starting stage 2)
- Scrapper
- Void Cradle (only with SotV)
- Cell Vent
- Null Portal
- Void Portal (only with SotV)
Enemies
On every other consecutive stage, a new type of enemy will appear. The selection of enemies is based on the difficulty coefficient upon entering the level. The higher the difficulty coefficient, the more likely chance that a boss enemy will be selected instead of regular enemies. Every enemy can be selected to be an enemy in the Void Fields, with the exception of:
 Hermit Crabs
 Hermit Crab
HP: 100 (+30 per level)
Damage: 12 (+2.4 per level)
Class: Ranged
Speed: 10 m/s
Armor: 0
 Lunar Chimera (Exploder)
Zenith DesignsHP: 180 (+54 per level)
Damage: 11 (+2.2 per level)
Class: Ranged / Self-Destruct
Speed: 8 m/s
Armor: 0
 Lunar Chimera (Golem)
Zenith DesignsHP: 1615 (+485 per level)
Damage: 35 (+7 per level)
Class: Ranged
Speed: 8 m/s
Armor: 0
 Lunar Chimera (Wisp)
Zenith DesignsHP: 850 (+255 per level)
Damage: 15 (+3 per level)
Class: Ranged
Speed: 18 m/s
Armor: 0 Lunar enemies


 Survivors of the Void - DLC Content
This content is part of the Survivors of the Void DLC. It is only available if the DLC is enabled when starting a run.
Click for more info.Void Barnacle
HP: 225 (+68 per level)
Damage: 6 (+1.2 per level)
Class: Ranged
Speed: 0 m/s
Armor: 0
 Survivors of the Void - DLC Content
This content is part of the Survivors of the Void DLC. It is only available if the DLC is enabled when starting a run.
Click for more info.Void Devastator
Destroyer of WorldsHP: 2800 (+840 per level)
Damage: 12 (+2.4 per level)
Class: Ranged / Self-Destruct
Speed: 8 m/s
Armor: 20
 Survivors of the Void - DLC Content
This content is part of the Survivors of the Void DLC. It is only available if the DLC is enabled when starting a run.
Click for more info.Void Jailer
HP: 2200 (+660 per level)
Damage: 14 (+2.8 per level)
Class: Ranged / Self-Destruct
Speed: 7 m/s
Armor: 0
 Void Reaver
HP: 1900 (+570 per level)
Damage: 12 (+2.4 per level)
Class: Ranged / Self-Destruct
Speed: 6 m/s
Armor: 0 Void enemies- All special bosses
- If the Survivors of the Void DLC is disabled, the
 Clay Dunestrider
 Clay Dunestrider
Ravenous SymbiontHP: 2100 (+630 per level)
Damage: 25 (+5 per level)
Class: Ranged
Speed: 9 m/s
Armor: 20, Magma Worm
 Magma Worm
Ancient Lava SwimmerHP: 2400 (+720 per level)
Damage: 10 (+2 per level)
Class: Melee
Speed: 20 m/s
Armor: 15, and Overloading Worm
 Overloading Worm
The ReminderHP: 12000 (+3600 per level)
Damage: 50 (+10 per level)
Class: Melee
Speed: 20 m/s
Armor: 15 will also be excluded.

.png)
.png)
.png)


On higher difficulties, ![]() ScavengersScavenger
ScavengersScavenger
Item HoarderHP: 3800 (+1140 per level)
Damage: 4 (+0.8 per level)
Class: Ranged
Speed: 3 m/s
Armor: 20 can spawn. Like the ![]() Artifact of Evolution, Scavengers will receive the monster items on top of the items pre-equipped on their spawn.
Artifact of Evolution, Scavengers will receive the monster items on top of the items pre-equipped on their spawn.
Void Portal
This portal is only available if the Survivors of the Void DLC is installed.
Upon breaching all 9 cells in the Void Fields, a Void Portal will open next to the Null Portal, giving the player two choices. Entering the Void Portal will take the player to the Hidden Realm: ![]()
![]() Survivors of the Void - DLC Content
Survivors of the Void - DLC Content
Void Locus is part of the Survivors of the Void DLC. It is only available if the DLC is enabled when starting a run.
Click for more info.![]() Void Locus
Void Locus![]()
![]()
![]() Survivors of the Void - DLC Content
Survivors of the Void - DLC Content
This content is part of the Survivors of the Void DLC. It is only available if the DLC is enabled when starting a run.
Click for more info.Void Locus (Hidden Realm)
Cell IIIVIIIIIILVIIIVLVILIVLLLVVVILIVLI
You dream of potential.
The Void Locus contains many Void Potentials and Cradles in place of chests, and is inhabited by Void monsters., which leads to ![]()
![]() Survivors of the Void - DLC Content
Survivors of the Void - DLC Content
The Planetarium is part of the Survivors of the Void DLC. It is only available if the DLC is enabled when starting a run.
Click for more info.![]() The Planetarium
The Planetarium![]()
![]()
![]() Survivors of the Void - DLC Content
Survivors of the Void - DLC Content
This content is part of the Survivors of the Void DLC. It is only available if the DLC is enabled when starting a run.
Click for more info.The Planetarium (Final)
Cell V
The Planetarium is an area somewhere within the Void, housing a collection of planets detained by the Void's denizens. It is inhabited primarily by the Voidling, the guard of the Planetarium or potentially the controller of the Void itself..
Logbook Entry
The Environment Log can be found beneath the stage, on a ledge with part of a large ring slightly protruding from it. The ledge is located roughly on the opposite side of the map from the long curved ramp that leads to the exit portal. For an easier time, try getting the log on ![]() Drizzle difficulty to mitigate the suffocating effect. Using
Drizzle difficulty to mitigate the suffocating effect. Using ![]() Loader
Loader LoaderThe Loader is a slow but powerful bruiser that can use her grappling hook to uniquely navigate the environment.
Class: Melee
HP: 160 (+48 per level)
Damage: 12 (+2.4 per level)
Armor: 20
Umbra: Bionic Powerhouse or ![]() Artificer
Artificer ArtificerThe Artificer is a high burst damage survivor who excels in fighting large groups and bosses alike.
Class: Ranged
HP: 110 (+33 per level)
Damage: 12 (+2.4 per level)
Armor: 0
Umbra: Herald of the House Beyond, and/or mobility items like ![]() Hopoo Feather
Hopoo Feather![]()
![]() Hopoo Feather
Hopoo Feather
Gain an extra jump.
Gain +1 (+1 per stack) maximum jump count. and ![]() Milky Chrysalis
Milky Chrysalis![]()
![]() 60sMilky Chrysalis
60sMilky Chrysalis
Gain temporary flight.
Sprout wings and fly for 15 seconds. Gain +20% movement speed for the duration., can also help getting to the ledge easier.
The log will disappear 5 minutes after entering the level, which means that it needs to be retrieved while the map is under the cover of darkness.
Environment Log location as seen after completing the event of the stage.
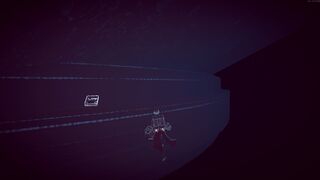
Environment Log during the event.
Video showing how to get the environmental log, using the Null Portal as a reference point.


Tips
- The
 Strides of Heresy
 Strides of Heresy
Replace your Utility Skill with 'Shadowfade'.
Replace your Utility Skill with Shadowfade.
Fade away, becoming intangible and gaining +30% movement speed. Heal for 18.2% (+18.2% per stack) of your maximum health. Lasts 3 (+3 per stack) seconds. and, to a lesser extent, both Bustling Fungus
 Bustling Fungus
Heal all nearby allies after standing still for 1 second.
After standing still for 1 second, create a zone that heals for 4.5% (+2.25% per stack) of your health every second to all allies within 3m (+1.5m per stack). and the Gnarled Woodsprite
 15sGnarled Woodsprite
Heal over time. Activate to send to an ally.
Gain a Woodsprite follower that heals for 1.5% of your maximum health/second. Can be sent to an ally to heal them for 10% of their maximum health. can be used to entirely negate the suffocation effect.- As of Survivors of the Void,
 Tougher Times
 Tougher Times
Chance to block incoming damage.
15% (+15% per stack) chance to block incoming damage. Unaffected by luck. no longer blocks the suffocation effect and Planula
 Planula
Receive flat healing when attacked.
Heal from incoming damage for 15 (+15 per stack). no longer heals damage from it. - On-damage items such as
 Razorwire
 Razorwire
Retaliate in a burst of razors on taking damage.
Getting hit causes you to explode in a burst of razors, dealing 160% damage. Hits up to 5 (+2 per stack) targets in a 25m (+10m per stack) radius are triggered by the suffocation effect as well.
- As of Survivors of the Void,
- The damage dealt per tick of suffocation damage is roughly equal to 1% of the player's current effective health, including Shields and Barrier.
- As of the Survivors of the Void Update,
 Repulsion Armor Plate
 Repulsion Armor Plate
Receive flat damage reduction from all attacks.
Reduce all incoming damage by 5 (+5 per stack). Cannot be reduced below 1. can no longer reduce suffocation damage. However, Bustling FungusBustling Fungus
Heal all nearby allies after standing still for 1 second.
After standing still for 1 second, create a zone that heals for 4.5% (+2.25% per stack) of your health every second to all allies within 3m (+1.5m per stack). andSurvivors of the Void - DLC Content
Weeping Fungus is part of the Survivors of the Void DLC. It is only available if the DLC is enabled when starting a run.
Click for more info. Weeping Fungus
 Survivors of the Void - DLC Content
This content is part of the Survivors of the Void DLC. It is only available if the DLC is enabled when starting a run.
Click for more info.Weeping Fungus
Heal while sprinting. Corrupts all Bustling Fungi.
Heals for 2% (+2% per stack) of your health every second while sprinting. Corrupts all Bustling Fungi. can be used as regeneration sources between Vent openings.- Weeping Fungus in particular is extremely useful. Unlike Bustling Fungus, it can provide healing while moving, giving more time to move to the next Vent if movement speed is lacking, or if a player has some difficulty navigating the Void Fields.
- After a cell is charged, the next cell's location can be found by following the beacon of light it emits.
- If the
 Artifact of Kin is active, no additional monster types are added past the first cell event. This can greatly reduce or increase the Void Fields' difficulty, depending on what that monster type is.
- While the Artifact of Kin is active, it is possible that no monster will be added for the first cell event. This results in no monsters spawning at all throughout the cell events.
- If the
 Artifact of Sacrifice is active, with enough skill or a strong enough build, items can be farmed here indefinitely, due to the high volume of enemies. This comes at some risk however, due to the monsters having items, and the suffocation effect slowly ticking health down if not mitigated.
- If the player has a RazorwireRazorwire
Retaliate in a burst of razors on taking damage.
Getting hit causes you to explode in a burst of razors, dealing 160% damage. Hits up to 5 (+2 per stack) targets in a 25m (+10m per stack) radius and a few copies of Bustling FungusBustling Fungus
Heal all nearby allies after standing still for 1 second.
After standing still for 1 second, create a zone that heals for 4.5% (+2.25% per stack) of your health every second to all allies within 3m (+1.5m per stack)./ Cautious Slug
 Cautious Slug
Rapidly heal outside of danger.
Increases base health regeneration by +3 hp/s (+3 hp/s per stack) while outside of combat./other forms of passive healing and a little bit of luck, it is possible to turn Void Fields into an automatic farm. The rapid suffocation damage will trigger Razorwire for high amounts of damage, meaning standing on one of the central pillar islands by the edge will kill any ground creatures very rapidly and most likely before the enemy can even attack. Having multiple Razorwire stacks makes this viable for virtually all monsters.
- If the player has a
- While many items aren't particularly threatening, monsters gaining certain items are made particularly dangerous:
 Focus Crystals
 Focus Crystal
Deal bonus damage to nearby enemies.
Increase damage to enemies within 13m by 20% (+20% per stack). will double the monsters' damage if they are sufficiently close to the player, making melee enemies considerably more threatening.- Similarly,
 Lens-Maker's Glasses
 Lens-Maker's Glasses
Gain 10% chance for hits to 'Critically Strike', dealing double damage.
Your attacks have a 10% (+10% per stack) chance to 'Critically Strike', dealing double damage. effectively increase all monsters' damage by 50%, on average.
- Similarly,
 Crowbars
 Crowbar
Deal bonus damage to enemies above 90% health.
Deal +75% (+75% per stack) damage to enemies above 90% health. are highly threatening, since attacks getting the bonus damage will be 4.75 times as strong: given how each cell necessitates the player to stay within their protective radii to stabilize them in the first place, this will make staying within them for any prolonged length of time a risky prospect (as their constants regenerative properties actually end up becoming more a liability than anything, bringing players back up to that 90% threshold for said bonus to constantly proc). Unless players happen to come in with some form of one-shot protection, they might find themselves in danger extremely quickly.- Should they happen to receive them while the
 Artifact of Glass is enabled, it is strongly advised to exit immediately.
- Should they happen to receive them while the
- Repulsion Armor PlatesRepulsion Armor Plate
Receive flat damage reduction from all attacks.
Reduce all incoming damage by 5 (+5 per stack). Cannot be reduced below 1. will be a minor annoyance to heavy-hitting Survivors like Loader
 LoaderThe Loader is a slow but powerful bruiser that can use her grappling hook to uniquely navigate the environment.
Class: Melee
HP: 160 (+48 per level)
Damage: 12 (+2.4 per level)
Armor: 20
Umbra: Bionic Powerhouse, but ones that deal rapid low damage like MUL-T
MUL-T MUL-TMUL-T is an aggressive survivor who has the tools necessary for any job!
Class: Melee / Ranged
HP: 200 (+60 per level)
Damage: 11 (+2.2 per level)
Armor: 12
Umbra: Right Tool for the Wrong Job with Auto-Nailgun
 Auto-Nailgun (Primary)Rapidly fire nails for 70% damage. Finishes with a blast of 12 nails.
Survivor: MUL-T will be crippled. - Tougher TimesTougher Times
Chance to block incoming damage.
15% (+15% per stack) chance to block incoming damage. Unaffected by luck. will give monsters a whopping 42.9% chance to avoid any and all damage. - Monsters use the same concept of secondary skills that players do if they have more than one attack, so
 Backup Magazines
 Backup Magazine
Add an extra charge of your Secondary skill.
Add +1 (+1 per stack) charge of your Secondary skill. affect these skills. For instance, a Beetle Guard's
 Beetle Guard
HP: 480 (+144 per level)
Damage: 12 (+2.4 per level)
Class: Melee / Ranged
Speed: 17 m/s
Armor: 0 shockwave attack will be used six times rapidly once they get in range, rather than simply firing once and then running closer while the attack cools down.  Kjaro's Band
 Kjaro's Band
High damage hits also blasts enemies with a runic flame tornado. Recharges over time.
Hits that deal more than 400% damage also blasts enemies with a runic flame tornado, dealing 300% (+300% per stack) TOTAL damage over time. Recharges every 10 seconds. and Runald's Band
 Runald's Band
High damage hits also blasts enemies with runic ice. Recharges over time.
Hits that deal more than 400% damage also blasts enemies with a runic ice blast, slowing them by 80% for 3s (+3s per stack) and dealing 250% (+250% per stack) TOTAL damage. Recharges every 10 seconds. can decimate players with ruthless efficiency. Since the monsters receive 3 copies of a given Band, an attack that activates Kjaro's Band will deal 10 times the normal amount, and Runald's, 8.5 times.- Kjaro's Band is particularly worrisome since its flame tornado deals damage over time, separate from the initial hit. If the main attack breaks the player's one-shot protection and activates Kjaro's Band, its follow-up attack is almost sure to finish them off. Runald's Band does not have this danger since its bonus attack happens simultaneously with the activating hit.
- Should the monsters receive both
 Medkits
 Medkit
Receive a delayed heal after taking damage.
2 seconds after getting hurt, heal for 20 plus an additional 5% (+5% per stack) of maximum health. and N'kuhana's Opinion
 N'kuhana's Opinion
Fire haunting skulls when healed.
Store 100% (+100% per stack) of healing as Soul Energy. After your Soul Energy reaches 10% of your maximum health, fire a skull that deals 250% of your Soul Energy as damage., it is advised to exit immediately. Any monster that is not repeatedly damaged or quickly killed will heal itself and trigger N'kuhana's Opinion multiple times. This is especially dangerous early in the game, when the Survivor usually hasn't snowballed into big, consistent DPS, but may have enough crowd control to damage monsters they can't get to or kill fast enough. - If monsters gain
 Unstable Tesla Coil
 Unstable Tesla Coil
Shock all nearby enemies every 10 seconds.
Fire out lightning that hits 3 (+2 per stack) enemies for 200% base damage every 0.5s. The Tesla Coil switches off every 10 seconds. on the final cell, it is highly advised to leave via the exit portal as soon as possible. - Enemies killed after stabilizing the cell can still be revived afterwards if they have
 Dio's Best Friend
 Dio's Best Friend
Cheat death. Consumed on use.
Upon death, this item will be consumed and you will return to life with 3 seconds of invulnerability..
- Survivors of the Void - DLC Content
Gup is part of the Survivors of the Void DLC. It is only available if the DLC is enabled when starting a run.
Click for more info. Gup
Gup Survivors of the Void - DLC Content
This content is part of the Survivors of the Void DLC. It is only available if the DLC is enabled when starting a run.
Click for more info.Gup
HP: 1000 (+300 per level)
Damage: 12 (+2.4 per level)
Class: Melee
Speed: 12 m/s
Armor: 0 will split intoSurvivors of the Void - DLC Content
Geep is part of the Survivors of the Void DLC. It is only available if the DLC is enabled when starting a run.
Click for more info. Geep
Geep Survivors of the Void - DLC Content
This content is part of the Survivors of the Void DLC. It is only available if the DLC is enabled when starting a run.
Click for more info.Geep
HP: 500 (+150 per level)
Damage: 6 (+2 per level)
Class: Melee
Speed: 8 m/s
Armor: 0 when killed by a cell being stabilized, which will allow the twoSurvivors of the Void - DLC Content
Geep is part of the Survivors of the Void DLC. It is only available if the DLC is enabled when starting a run.
Click for more info. GeepsSurvivors of the Void - DLC Content
This content is part of the Survivors of the Void DLC. It is only available if the DLC is enabled when starting a run.
Click for more info.Geep
HP: 500 (+150 per level)
Damage: 6 (+2 per level)
Class: Melee
Speed: 8 m/s
Armor: 0 to spawn, despite no cell being active.- Same effect applies for Survivors of the Void - DLC Content
Geep is part of the Survivors of the Void DLC. It is only available if the DLC is enabled when starting a run.
Click for more info. GeepSurvivors of the Void - DLC Content
This content is part of the Survivors of the Void DLC. It is only available if the DLC is enabled when starting a run.
Click for more info.Geep
HP: 500 (+150 per level)
Damage: 6 (+2 per level)
Class: Melee
Speed: 8 m/s
Armor: 0 toSurvivors of the Void - DLC Content
Gip is part of the Survivors of the Void DLC. It is only available if the DLC is enabled when starting a run.
Click for more info. Gip
Gip Survivors of the Void - DLC Content
This content is part of the Survivors of the Void DLC. It is only available if the DLC is enabled when starting a run.
Click for more info.Gip
HP: 250 (+75 per level)
Damage: 3 (+0.6 per level)
Class: Melee
Speed: 5 m/s
Armor: 0.
- Same effect applies for


Lore
The cells were for dangerous creatures.

The cells were for rare, powerful relics of exponential strength.

The cells were for ancient automata of war.

The cells were for scientists and inventors and explorers.

The cells were for gods.

The cells were for everything.
Version History
- Major Content
- Added New Lore Entry: Hidden Realm: Void Fields
- Bug Fixes
- Fixed enemy Beetle GuardsBeetle Guard
HP: 480 (+144 per level)
Damage: 12 (+2.4 per level)
Class: Melee / Ranged
Speed: 17 m/s
Armor: 0 not appearing in Void Fields
- Fixed enemy
- Bug Fixes
- Fix Void Fields safe zones on
 Eclipse 2 being larger than the actual charging radius
- Fix Void Fields safe zones on
- Bug Fixes
- Fix the initial monster spawn on Hidden Realm: Void Fields not populating the HUD
- Gameplay Changes
- 🌧 Time is now stopped in ‘Void Fields’
- 🌧 Update ‘Cell Vents’ to only charge while the player remains inside the bubble
- 🌧 Fix health degeneration not running on the final round of Cells
- Enemy item indicator on the HUD now displays the number of item stacks
- Bug Fixes
- 🌧 Fix ‘Cosmic Explorer’ not counting the portal to the Void Fields
- Major Content
- Added New Hidden Realm: Void Fields
- Added New Environment Log: Void Fields
| Risk of Rain 2 Wiki |
|---|
| Main |
| Artifacts • Challenges • Chests • Difficulty • Drones • Equipment • Interactables • Items • Item Stacking • Lore • Mechanics • Monsters • Newt Altars • Prismatic Trial • Shrines • Status Effects |
| Survivors |
| AcridAcrid is a melee-range hybrid who uses powerful poisons to melt tanky enemies. Class: Melee / Ranged HP: 160 (+48 per level) Damage: 15 (+3 per level) Armor: 20 Umbra: Test Subject • ArtificerThe Artificer is a high burst damage survivor who excels in fighting large groups and bosses alike.Class: Ranged HP: 110 (+33 per level) Damage: 12 (+2.4 per level) Armor: 0 Umbra: Herald of the House Beyond •  BanditThe Bandit is a high-skill combo character that can dish out devastating backstabs while weaving in and out of stealth. BanditThe Bandit is a high-skill combo character that can dish out devastating backstabs while weaving in and out of stealth.Class: Ranged HP: 110 (+33 per level) Damage: 12 (+2.4 per level) Armor: 0 Umbra: Desperate Outlaw •  CaptainThe Captain is a unique survivor that can control the battlefield with utility and damage - with help from the UES Safe Travels. CaptainThe Captain is a unique survivor that can control the battlefield with utility and damage - with help from the UES Safe Travels.Class: Ranged HP: 110 (+33 per level) Damage: 12 (+2.4 per level) Armor: 0 Umbra: Tired Veteran •  CommandoThe Commando is a jack-of-all-trades character that is reliable in all situations of the game. CommandoThe Commando is a jack-of-all-trades character that is reliable in all situations of the game.Class: Ranged HP: 110 (+33 per level) Damage: 12 (+2.4 per level) Armor: 0 Umbra: Cornered Gunslinger •  EngineerThe Engineer is a unique class that requires planning and positioning to be successful. EngineerThe Engineer is a unique class that requires planning and positioning to be successful.Class: Ranged HP: 130 (+39 per level) Damage: 14 (+2.8 per level) Armor: 0 Umbra: Fortification Expert •  HereticThe Heretic is a powerful character who can only be accessed through extraordinary means. HereticThe Heretic is a powerful character who can only be accessed through extraordinary means.Class: Ranged HP: 440 (+132 per level) Damage: 18 (+3.6 per level) Armor: 0 Umbra: Unorthodoxy Risen •  HuntressThe Huntress is an extremely mobile but fragile survivor with a high damage output. HuntressThe Huntress is an extremely mobile but fragile survivor with a high damage output.Class: Ranged HP: 90 (+27 per level) Damage: 12 (+2.4 per level) Armor: 0 Umbra: Judge, Jury, Executioner • LoaderThe Loader is a slow but powerful bruiser that can use her grappling hook to uniquely navigate the environment.Class: Melee HP: 160 (+48 per level) Damage: 12 (+2.4 per level) Armor: 20 Umbra: Bionic Powerhouse •  MercenaryThe Mercenary is a high skill melee survivor that uses his many dodges to weave in and out of combat. MercenaryThe Mercenary is a high skill melee survivor that uses his many dodges to weave in and out of combat.Class: Melee HP: 110 (+33 per level) Damage: 12 (+2.4 per level) Armor: 20 Umbra: Hired Blade •  MUL-TMUL-T is an aggressive survivor who has the tools necessary for any job! MUL-TMUL-T is an aggressive survivor who has the tools necessary for any job!Class: Melee / Ranged HP: 200 (+60 per level) Damage: 11 (+2.2 per level) Armor: 12 Umbra: Right Tool for the Wrong Job • Railgunner is part of the Survivors of the Void DLC. It is only available if the DLC is enabled when starting a run. Click for more info.  This content is part of the Survivors of the Void DLC. It is only available if the DLC is enabled when starting a run. Click for more info.RailgunnerThe Railgunner is a long-range, single target survivor that can instantly kill any high priority target - and from any range. Class: Ranged HP: 110 (+33 per level) Damage: 12 (+2.4 per level) Armor: 0 Umbra: Forgotten Nomad •  REXREX is a half robot / half plant that uses HP to cast devastating skills from a distance. The plant nor the robot could survive this planet alone – but thankfully they have each other. REXREX is a half robot / half plant that uses HP to cast devastating skills from a distance. The plant nor the robot could survive this planet alone – but thankfully they have each other.Class: Ranged HP: 130 (+39 per level) Damage: 12 (+2.4 per level) Armor: 20 Umbra: Symbiotes • Void Fiend is part of the Survivors of the Void DLC. It is only available if the DLC is enabled when starting a run. Click for more info.  This content is part of the Survivors of the Void DLC. It is only available if the DLC is enabled when starting a run. Click for more info.Void FiendThe Void Fiend is a corrupted survivor that fluctuates between a controlled and corrupted form, each with different strengths and weaknesses. Managing this curse has become its fate. Class: Ranged HP: 110 (+33 per level) Damage: 12 (+2.4 per level) Armor: 0 Umbra: Corrupted Amnesiac |
| Environments |
| Abandoned Aqueduct Origin of Tar You dream of sand beneath your feet. Massive skeletons and pools of tar are littered around, and a towering aqueduct pouring down tar dominates the area. • Abyssal Depths Tectonic Relics You dream of fire. A hellfire-forged zone of blazing heat, the Abyssal Depths are believed to be a continuation and adaptation of the Magma Barracks from Risk of Rain. • Aphelian Sanctuary is part of the Survivors of the Void DLC. It is only available if the DLC is enabled when starting a run. Click for more info. Aphelian Sanctuary This content is part of the Survivors of the Void DLC. It is only available if the DLC is enabled when starting a run. Click for more info.Aphelian Sanctuary (Stage 2) Cleansing Center You dream of clarity. • Commencement Moon of Petrichor V You dream of glass and dirt. Large domain located above the shattered breach of  Mithrix MithrixKing of NothingHP: 1000 (+300 per level) Damage: 16 (+3.2 per level) Class: Melee / Ranged Speed: 15 m/s Armor: 20 and Providence's tools of creation. • Distant Roost Ground Zero You dream of waves, crashing on cliffsides. Spires of earth jut through the fog and unknown avian creatures circle far peaks guarding their broods. • Rallypoint Delta 'Contact Light' Survivor Camp You dream of quiet snowfall. Rallypoint Delta is the remains of a makeshift camp constructed by a group of scattered crew members from the UES Contact Light, somewhere in the frigid tundra of Petrichor V. • Scorched Acres Wisp Installation You dream of wind, blowing through trees. Large, circular platforms make up the majority of the stage, and embers float through the air. • Siphoned Forest is part of the Survivors of the Void DLC. It is only available if the DLC is enabled when starting a run. Click for more info. Siphoned Forest This content is part of the Survivors of the Void DLC. It is only available if the DLC is enabled when starting a run. Click for more info.Siphoned Forest (Stage 1) Ground Zero You dream of fire and ice. The map is blanketed in a layer of snow, with large trees surrounded by platforms spanning multiple levels. • Siren's Call Ship Graveyard You dream of wind. • Sky Meadow Sprite Fields You dream of serenity. • Sulfur Pools is part of the Survivors of the Void DLC. It is only available if the DLC is enabled when starting a run. Click for more info. Sulfur Pools This content is part of the Survivors of the Void DLC. It is only available if the DLC is enabled when starting a run. Click for more info.Sulfur Pools (Stage 3) Pungent Spring You dream of brimstone. Tiered lakes of shallow sulfur pools. Arcing bridges and underground caves connect the map together. • Sundered Grove Dormant Locus You dream of violent growth. Ancient flora has risen up to reclaim this once sacred refuge. Mazes of roots and overgrown fungus have twisted the landscape, leaving only ruins. • Titanic Plains Ground Zero You dream of rolling hills. Gigantic stone arches bracket the skyline, while the main play-field overlooks a vast fractured tectonic lowland. • Wetland Aspect Rehabilitation Zone You dream of twisting roots. Full of ruined stone structures and swampy areas filled with water. |
| Hidden Realms |
| A Moment, Fractured Hidden Realm: A Moment, Fractured Multiple floating islands in a void, with sharp blue crystals embedded in them. The Obelisk can be found on top of the last island. • A Moment, Whole Hidden Realm: A Moment, Whole A bleak and desolate realm. The refuge of the MithrixKing of NothingHP: 1000 (+300 per level) Damage: 16 (+3.2 per level) Class: Melee / Ranged Speed: 15 m/s Armor: 20 vengeance and destruction. • Bazaar Between Time Hidden Realm: Bazaar Between Time This stage serves as the shop in Risk of Rain 2. Players can purchase various Items with Lunar Coins or exchange items for higher-rarity ones in two crucibles. • Bulwark's Ambry Hidden Realm: Bulwark's Ambry The area consists of block-shaped platforms, with the Artifact Reliquary in the center. • Gilded Coast Hidden Realm: Gilded Coast You dream of wealth. This area is where the player fights the boss Aurelionite, the Titanic Goldweaver. • The Planetarium is part of the Survivors of the Void DLC. It is only available if the DLC is enabled when starting a run. Click for more info. The Planetarium This content is part of the Survivors of the Void DLC. It is only available if the DLC is enabled when starting a run. Click for more info.The Planetarium (Final) Cell V The Planetarium is an area somewhere within the Void, housing a collection of planets detained by the Void's denizens. It is inhabited primarily by the Voidling, the guard of the Planetarium or potentially the controller of the Void itself. • Void Fields Cosmic Prison Hidden Realm accessible only through the Bazaar Between Time. Until the cell is stabilized, the Void Fields will constantly "suffocate" the player for a small percentage of their current health. • Void Locus is part of the Survivors of the Void DLC. It is only available if the DLC is enabled when starting a run. Click for more info. Void Locus This content is part of the Survivors of the Void DLC. It is only available if the DLC is enabled when starting a run. Click for more info.Void Locus (Hidden Realm) Cell IIIVIIIIIILVIIIVLVILIVLLLVVVILIVLI You dream of potential. The Void Locus contains many Void Potentials and Cradles in place of chests, and is inhabited by Void monsters. |
| Expansions |
This content is part of the Survivors of the Void DLC. It is only available if the DLC is enabled when starting a run. Click for more info.Survivors of the Void |
| Alternate Game Modes |
| Eclipse • Prismatic Trials • This content is part of the Survivors of the Void DLC. It is only available if the DLC is enabled when starting a run. Click for more info.Simulacrum |
| Mechanics |
| Armor • Damage • Directors • Enemy AI • Family Events • Gold • Health • Item Stacking • Lunar Coins • Movement Speed • Proc Coefficient • This content is part of the Survivors of the Void DLC. It is only available if the DLC is enabled when starting a run. Click for more info.Void Fog |
| Other |
| Developer Console • Development Team • Languages • Modding • Soundtrack • Unreleased Items • Version History |