Teleporter
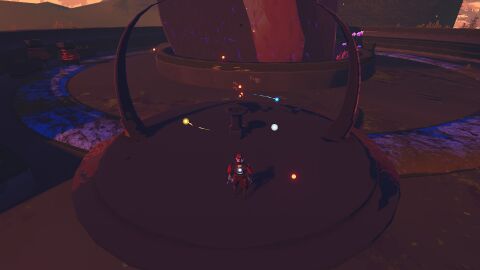
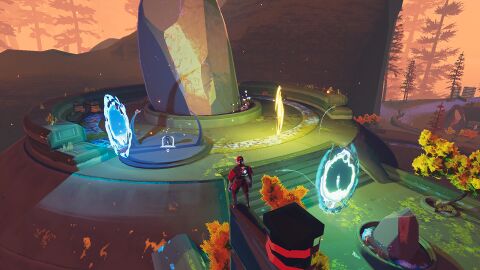
The Teleporter is a unique circular interactable located in all main Environments. Finding and activating the Teleporter is the major objective in each main stage. To assist the player in locating it, the orange particles it emits can be seen from a distance, and it seems to emit a very faint tune.
The Teleporter allows the player (and other players if playing in multiplayer) to travel to the next Environment when fully charged.
One Teleporter will spawn on each Environment. The Teleporter can spawn anywhere an interactable could be placed, provided that there is enough space for it in that location. The Teleporter will always attempt to spawn far away from the player's spawn location, and is prohibited from spawning in various areas in certain maps.
Some Teleporter locations may result in it to be partially hidden in dark areas or even found clipping through terrain or objects. The slow-moving particle effects in the air can greatly assist with finding the teleporter, as most background particles are always moving towards it.
![]() Sky MeadowSky Meadow (Stage 5)
Sky MeadowSky Meadow (Stage 5)
Sprite Fields
You dream of serenity.
has a unique Teleporter, called the Primordial Teleporter, which can be used to access ![]() CommencementCommencement (Final)
CommencementCommencement (Final)
Moon of Petrichor V
You dream of glass and dirt.
Large domain located above the shattered breach of ![]() Petrichor V's moon. It is made up of the shattered remains of four individual sections, emblematic of
Petrichor V's moon. It is made up of the shattered remains of four individual sections, emblematic of ![]() MithrixMithrix
MithrixMithrix
King of NothingHP: 1000 (+300 per level)
Damage: 16 (+3.2 per level)
Class: Melee / Ranged
Speed: 15 m/s
Armor: 20 and Providence's tools of creation. and the ![]() final bossMithrix
final bossMithrix
King of NothingHP: 1000 (+300 per level)
Damage: 16 (+3.2 per level)
Class: Melee / Ranged
Speed: 15 m/s
Armor: 20. Rings on the outside of the Teleporter can be interacted with prior to starting the Teleporter Event to either align with the moon, accessing Commencement, or to align with the planet, which loops the player back to one of the first stages.
Teleporter Event
Activating and completing a Teleporter Event is the primary mean of advancing the game.
Initiation
After locating the Teleporter, interacting with it will start the Teleporter Event. The message "You activated the Teleporter" appears. Multiple monsters spawn immediately, along with the Teleporter Boss to defeat. A red dome appears, roughly 120 meters in diameter, demarcating the effective area of the Teleporter and locking all interactables outside its radius (with the exception of Barrels and Scrappers). The Teleporter begins to charge, indicated by the objective "Charge the Teleporter(% progress)".
Teleporter Boss
Not to be confused with Bosses, a tier of Monsters.
The Teleporter Boss consists of one or several Bosses, depending on the difficulty and number of players. Bosses and Elites that serve as the Teleporter Boss can be identified by their distinctive red health bar.
Occasionally, a Horde of Many will spawn in place of a boss(es), consisting of several Elite non-boss monsters. For a more in-depth explanation of what causes this, consult the Directors page.
Completion
In order to complete the Teleporter Event, the Teleporter Boss(es) must be killed and the Teleporter must be fully charged.
The Teleporter charges as long as the player(s) is in its dome. Once the Teleporter is charged to 99%, no more monsters will spawn naturally in the current Environment. The charging rate scales linearly with the number of players standing inside the red dome, out of the total number of players currently alive. Charging the Teleporter requires a minimum of 90 seconds if all living players always stay within the red dome. The amount of time to charge the Teleporter is reduced based on the amount of ![]() Focused ConvergenceFocused Convergence
Focused ConvergenceFocused Convergence
Increase the speed of Teleporter charging... BUT reduce the size of the zone.
Teleporters charge 30% (+30% per stack) faster, but the size of the Teleporter zone is 50% (-50% per stack) smaller. the party has.
Once the Teleporter is fully charged and the Teleporter boss is dead, the red dome will disappear and interactables on the map will be unlocked. Any Orb orbiting the Teleporter will form its corresponding Portal. Interacting again with the Teleporter will take the player(s) to the next main environment.
Primordial Teleporter
The Primordial Teleporter is an interactable located only in ![]() Sky MeadowSky Meadow (Stage 5)
Sky MeadowSky Meadow (Stage 5)
Sprite Fields
You dream of serenity.
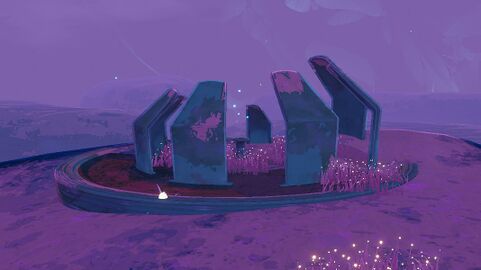
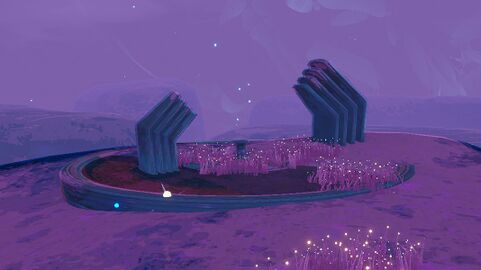
. It has a distinctly different appearance from a regular Teleporter, featuring a spiral of eight flat, rectangular spires of escalating sizes that are bent inwards towards the center of the Teleporter's base.
The main function that differentiates the Primordial Teleporter from a regular one is that its outer ring can be interacted with to determine whether the player will travel to ![]() CommencementCommencement (Final)
CommencementCommencement (Final)
Moon of Petrichor V
You dream of glass and dirt.
Large domain located above the shattered breach of ![]() Petrichor V's moon. It is made up of the shattered remains of four individual sections, emblematic of
Petrichor V's moon. It is made up of the shattered remains of four individual sections, emblematic of ![]() MithrixMithrix
MithrixMithrix
King of NothingHP: 1000 (+300 per level)
Damage: 16 (+3.2 per level)
Class: Melee / Ranged
Speed: 15 m/s
Armor: 20 and Providence's tools of creation., or loop back to the first stage.
Interacting with the rectangular spires away from the center of the Teleporter will prompt an animation, shifting the ending location of the Teleporter as well as changing its appearance. When the spires are in their default state of a near-circular spiral, the Teleporter will be "aligned to the moon" and will send players to Commencement. When the spires are shifted and rotate into two large clumps on opposite sides of each other that resemble the "horns" on a standard Teleporter, it will be "aligned to the planet" and will send the player back to the first stage.
Regardless of the Teleporter's alignment, using a Blue Portal will, after the ![]() Bazaar Between TimeBazaar Between Time (Hidden Realm)
Bazaar Between TimeBazaar Between Time (Hidden Realm)
Hidden Realm: Bazaar Between Time
This stage serves as the shop in Risk of Rain 2. Players can purchase various Items with Lunar Coins or exchange items for higher-rarity ones in two crucibles., send the player back to the first stage. The same will happen with a Gold Portal, after the ![]() Gilded CoastGilded Coast (Hidden Realm)
Gilded CoastGilded Coast (Hidden Realm)
Hidden Realm: Gilded Coast
You dream of wealth.
This area is where the player fights the boss Aurelionite, the Titanic Goldweaver., and with the Artifact Portal, after the Artifact Reliquary.
Drops
One random Uncommon item will drop from the Teleporter after the Teleporter Boss has been defeated. In multiplayer, one item will drop per player, even for dead players. For each Shrine of the Mountain that was active, 100% more items will drop. In either case, all the uncommon items dropped are the same; the Teleporter will never drop multiple different uncommon items at once.
If the Teleporter Boss was a monster with a corresponding Boss item, each uncommon item dropped has a 15% chance to be replaced with that boss item instead. If the Teleporter Boss was a Horde of Many or a Scavenger (who has no boss item), then all the items will be uncommon.
Orbs & Portals
Achieving specific actions before starting the Teleporter Event will spawn Orbs that will orbit around the Teleporter. Upon completing the Teleporter Event, each Orb will transform into its corresponding Portal, leading to different Hidden Realms.
- A Blue Orb will spawn when activating a Newt Altar. It also has a chance to randomly spawn at the beginning of each stage, though this chance is decreased for each Blue Orb that has been spawned during the run. It will transform into a Blue Portal leading to the
 Bazaar Between TimeBazaar Between Time (Hidden Realm)
Hidden Realm: Bazaar Between Time
This stage serves as the shop in Risk of Rain 2. Players can purchase various Items with Lunar Coins or exchange items for higher-rarity ones in two crucibles.. - A Golden Orb will spawn when activating an Altar of Gold. It will transform into a Golden Portal leading to
 Gilded CoastGilded Coast (Hidden Realm)
Hidden Realm: Gilded Coast
You dream of wealth.
This area is where the player fights the boss Aurelionite, the Titanic Goldweaver.. - A Celestial Orb will spawn on the third stage (
 Rallypoint DeltaRallypoint Delta (Stage 3)
'Contact Light' Survivor Camp
You dream of quiet snowfall.
Rallypoint Delta is the remains of a makeshift camp constructed by a group of scattered crew members from the UES Contact Light, somewhere in the frigid tundra of Petrichor V./ Scorched AcresScorched Acres (Stage 3)
Wisp Installation
You dream of wind, blowing through trees.
Large, circular platforms make up the majority of the stage, and embers float through the air./ Survivors of the Void - DLC Content
Sulfur Pools is part of the Survivors of the Void DLC. It is only available if the DLC is enabled when starting a run.
Click for more info. Sulfur Pools
 Survivors of the Void - DLC Content
This content is part of the Survivors of the Void DLC. It is only available if the DLC is enabled when starting a run.
Click for more info.Sulfur Pools (Stage 3)
Pungent Spring
You dream of brimstone.
Tiered lakes of shallow sulfur pools. Arcing bridges and underground caves connect the map together.) after the first loop. It will transform into a Celestial Portal leading to A Moment, FracturedA Moment, Fractured (Hidden Realm)
Hidden Realm: A Moment, Fractured
Multiple floating islands in a void, with sharp blue crystals embedded in them. The Obelisk can be found on top of the last island.. - A Purple Orb Can spawn at random or spawn after beating
 Void FieldsVoid Fields (Hidden Realm)
Cosmic Prison
Hidden Realm accessible only through the Bazaar Between Time. Until the cell is stabilized, the Void Fields will constantly "suffocate" the player for a small percentage of their current health.. It will transform into a Void Portal leading to the Survivors of the Void - DLC Content
Void Locus is part of the Survivors of the Void DLC. It is only available if the DLC is enabled when starting a run.
Click for more info. Void Locus
 Survivors of the Void - DLC Content
This content is part of the Survivors of the Void DLC. It is only available if the DLC is enabled when starting a run.
Click for more info.Void Locus (Hidden Realm)
Cell IIIVIIIIIILVIIIVLVILIVLLLVVVILIVLI
You dream of potential.
The Void Locus contains many Void Potentials and Cradles in place of chests, and is inhabited by Void monsters..
Multiple Orbs can be spawned on a single Teleporter, allowing for multiple Portals to spawn. However, players will only be able to use one of the Portals (or the Teleporter itself).
Players may still be able to activate a Portal after initially activating the Teleporter during the delay between actually being teleported, changing the course to the portal's target, instead of the Teleporter's.
Challenge of the Mountain
Main article: Shrine of the Mountain
Upon activating a Shrine of the Mountain, the difficulty of the Teleporter Event will be increased. For each shrine active, the director of the Teleporter Event will gain 100% more credits, but the Teleporter will also drop 100% more items as a reward for beating the bosses.
Prismatic Trial
Main article: Prismatic Trial
The two Teleporters in Prismatic Trials are unique in that they instantly charge once the boss is defeated. Additionally, the player cannot activate the Teleporter until they have destroyed at least three Time Crystals.
The second stage's Teleporter Boss will always be an Elite.
Version History
- Quality of Life
- Updated the Teleporter model
- Gameplay Changes
- Change the amount of Hordes of Many that were spawning as the teleporter boss
- Bug Fixes
- Fix the teleporter not instantly reaching full charge on killing the Prismatic Trials boss
- Bug Fixes
- Fix Teleporters not using the correct decal layer
- Quality of Life
- 🌧Prevent
 GolemsStone Golem
HP: 480 (+144 per level)
Damage: 20 (+4 per level)
Class: Ranged / Melee
Speed: 6.6 m/s
Armor: 0 from ever being chosen as a Teleporter boss - 🌧Force Teleporter Boss to initially target the player who activated it
- 🌧Prevent
- Bug Fixes
- Fix Teleporters not using the correct decal layer
- Gameplay Changes
- Add slight rim glow
- Increase teleporter passive particle radius from 38 to 60. Increase particle count so density remains the same.
- A lot of players are having issues finding the Teleporter. Players are starting to notice the passive particles indicating the teleporter is around - we will try increasing the radius to see if it helps. The rim glow will help distinguish it from identically colored surfaces. This is intended to be a fairly big change - if it turns out we jumped the gun and the community was simply learning, we can approach a middle ground.
- QOL
- Remove collision from Teleporter nub to prevent monsters getting stuck
| Risk of Rain 2 Wiki |
|---|
| Main |
| Artifacts • Challenges • Chests • Difficulty • Drones • Equipment • Interactables • Items • Item Stacking • Lore • Mechanics • Monsters • Newt Altars • Prismatic Trial • Shrines • Status Effects |
| Survivors |
Class: Melee / Ranged HP: 160 (+48 per level) Damage: 15 (+3 per level) Armor: 20 Umbra: Test Subject • Class: Ranged HP: 110 (+33 per level) Damage: 12 (+2.4 per level) Armor: 0 Umbra: Herald of the House Beyond • Class: Ranged HP: 110 (+33 per level) Damage: 12 (+2.4 per level) Armor: 0 Umbra: Desperate Outlaw • Class: Ranged HP: 110 (+33 per level) Damage: 12 (+2.4 per level) Armor: 0 Umbra: Tired Veteran • Class: Ranged HP: 110 (+33 per level) Damage: 12 (+2.4 per level) Armor: 0 Umbra: Cornered Gunslinger • Class: Ranged HP: 130 (+39 per level) Damage: 14 (+2.8 per level) Armor: 0 Umbra: Fortification Expert • Class: Ranged HP: 440 (+132 per level) Damage: 18 (+3.6 per level) Armor: 0 Umbra: Unorthodoxy Risen • Class: Ranged HP: 90 (+27 per level) Damage: 12 (+2.4 per level) Armor: 0 Umbra: Judge, Jury, Executioner • Class: Melee HP: 160 (+48 per level) Damage: 12 (+2.4 per level) Armor: 20 Umbra: Bionic Powerhouse • Class: Melee HP: 110 (+33 per level) Damage: 12 (+2.4 per level) Armor: 20 Umbra: Hired Blade • Class: Melee / Ranged HP: 200 (+60 per level) Damage: 11 (+2.2 per level) Armor: 12 Umbra: Right Tool for the Wrong Job • Railgunner is part of the Survivors of the Void DLC. It is only available if the DLC is enabled when starting a run. Click for more info. This content is part of the Survivors of the Void DLC. It is only available if the DLC is enabled when starting a run. Click for more info.RailgunnerThe Railgunner is a long-range, single target survivor that can instantly kill any high priority target - and from any range. Class: Ranged HP: 110 (+33 per level) Damage: 12 (+2.4 per level) Armor: 0 Umbra: Forgotten Nomad • Class: Ranged HP: 130 (+39 per level) Damage: 12 (+2.4 per level) Armor: 20 Umbra: Symbiotes • Void Fiend is part of the Survivors of the Void DLC. It is only available if the DLC is enabled when starting a run. Click for more info. This content is part of the Survivors of the Void DLC. It is only available if the DLC is enabled when starting a run. Click for more info.Void FiendThe Void Fiend is a corrupted survivor that fluctuates between a controlled and corrupted form, each with different strengths and weaknesses. Managing this curse has become its fate. Class: Ranged HP: 110 (+33 per level) Damage: 12 (+2.4 per level) Armor: 0 Umbra: Corrupted Amnesiac |
| Environments |
| Abandoned AqueductAbandoned Aqueduct (Stage 2) Origin of Tar You dream of sand beneath your feet. Massive skeletons and pools of tar are littered around, and a towering aqueduct pouring down tar dominates the area. • Abyssal DepthsAbyssal Depths (Stage 4) Tectonic Relics You dream of fire. A hellfire-forged zone of blazing heat, the Abyssal Depths are believed to be a continuation and adaptation of the Magma Barracks from Risk of Rain. • Aphelian Sanctuary is part of the Survivors of the Void DLC. It is only available if the DLC is enabled when starting a run. Click for more info. Aphelian Sanctuary This content is part of the Survivors of the Void DLC. It is only available if the DLC is enabled when starting a run. Click for more info.Aphelian Sanctuary (Stage 2) Cleansing Center You dream of clarity. • CommencementCommencement (Final) Moon of Petrichor V You dream of glass and dirt. Large domain located above the shattered breach of King of NothingHP: 1000 (+300 per level) Damage: 16 (+3.2 per level) Class: Melee / Ranged Speed: 15 m/s Armor: 20 and Providence's tools of creation. • Distant RoostDistant Roost (Stage 1) Ground Zero You dream of waves, crashing on cliffsides. Spires of earth jut through the fog and unknown avian creatures circle far peaks guarding their broods. • Rallypoint DeltaRallypoint Delta (Stage 3) 'Contact Light' Survivor Camp You dream of quiet snowfall. Rallypoint Delta is the remains of a makeshift camp constructed by a group of scattered crew members from the UES Contact Light, somewhere in the frigid tundra of Petrichor V. • Scorched AcresScorched Acres (Stage 3) Wisp Installation You dream of wind, blowing through trees. Large, circular platforms make up the majority of the stage, and embers float through the air. • Siphoned Forest is part of the Survivors of the Void DLC. It is only available if the DLC is enabled when starting a run. Click for more info. Siphoned Forest This content is part of the Survivors of the Void DLC. It is only available if the DLC is enabled when starting a run. Click for more info.Siphoned Forest (Stage 1) Ground Zero You dream of fire and ice. The map is blanketed in a layer of snow, with large trees surrounded by platforms spanning multiple levels. • Siren's CallSiren's Call (Stage 4) Ship Graveyard You dream of wind. • Sky MeadowSky Meadow (Stage 5) Sprite Fields You dream of serenity. • Sulfur Pools is part of the Survivors of the Void DLC. It is only available if the DLC is enabled when starting a run. Click for more info. Sulfur Pools This content is part of the Survivors of the Void DLC. It is only available if the DLC is enabled when starting a run. Click for more info.Sulfur Pools (Stage 3) Pungent Spring You dream of brimstone. Tiered lakes of shallow sulfur pools. Arcing bridges and underground caves connect the map together. • Sundered GroveSundered Grove (Stage 4) Dormant Locus You dream of violent growth. Ancient flora has risen up to reclaim this once sacred refuge. Mazes of roots and overgrown fungus have twisted the landscape, leaving only ruins. • Titanic PlainsTitanic Plains (Stage 1) Ground Zero You dream of rolling hills. Gigantic stone arches bracket the skyline, while the main play-field overlooks a vast fractured tectonic lowland. • Wetland AspectWetland Aspect (Stage 2) Rehabilitation Zone You dream of twisting roots. Full of ruined stone structures and swampy areas filled with water. |
| Hidden Realms |
| A Moment, FracturedA Moment, Fractured (Hidden Realm) Hidden Realm: A Moment, Fractured Multiple floating islands in a void, with sharp blue crystals embedded in them. The Obelisk can be found on top of the last island. • A Moment, WholeA Moment, Whole (Hidden Realm) Hidden Realm: A Moment, Whole A bleak and desolate realm. The refuge of the King of NothingHP: 1000 (+300 per level) Damage: 16 (+3.2 per level) Class: Melee / Ranged Speed: 15 m/s Armor: 20 vengeance and destruction. • Bazaar Between TimeBazaar Between Time (Hidden Realm) Hidden Realm: Bazaar Between Time This stage serves as the shop in Risk of Rain 2. Players can purchase various Items with Lunar Coins or exchange items for higher-rarity ones in two crucibles. • Bulwark's AmbryBulwark's Ambry (Hidden Realm) Hidden Realm: Bulwark's Ambry The area consists of block-shaped platforms, with the Artifact Reliquary in the center. • Gilded CoastGilded Coast (Hidden Realm) Hidden Realm: Gilded Coast You dream of wealth. This area is where the player fights the boss Aurelionite, the Titanic Goldweaver. • The Planetarium is part of the Survivors of the Void DLC. It is only available if the DLC is enabled when starting a run. Click for more info. The Planetarium This content is part of the Survivors of the Void DLC. It is only available if the DLC is enabled when starting a run. Click for more info.The Planetarium (Final) Cell V The Planetarium is an area somewhere within the Void, housing a collection of planets detained by the Void's denizens. It is inhabited primarily by the Voidling, the guard of the Planetarium or potentially the controller of the Void itself. • Void FieldsVoid Fields (Hidden Realm) Cosmic Prison Hidden Realm accessible only through the Bazaar Between Time. Until the cell is stabilized, the Void Fields will constantly "suffocate" the player for a small percentage of their current health. • Void Locus is part of the Survivors of the Void DLC. It is only available if the DLC is enabled when starting a run. Click for more info. Void Locus This content is part of the Survivors of the Void DLC. It is only available if the DLC is enabled when starting a run. Click for more info.Void Locus (Hidden Realm) Cell IIIVIIIIIILVIIIVLVILIVLLLVVVILIVLI You dream of potential. The Void Locus contains many Void Potentials and Cradles in place of chests, and is inhabited by Void monsters. |
| Expansions |
This content is part of the Survivors of the Void DLC. It is only available if the DLC is enabled when starting a run. Click for more info.Survivors of the Void |
| Alternate Game Modes |
| Eclipse • Prismatic Trials • This content is part of the Survivors of the Void DLC. It is only available if the DLC is enabled when starting a run. Click for more info.Simulacrum |
| Mechanics |
| Armor • Damage • Directors • Enemy AI • Family Events • Gold • Health • Item Stacking • Lunar Coins • Movement Speed • Proc Coefficient • This content is part of the Survivors of the Void DLC. It is only available if the DLC is enabled when starting a run. Click for more info.Void Fog |
| Other |
| Developer Console • Development Team • Languages • Modding • Soundtrack • Unreleased Items • Version History |


